
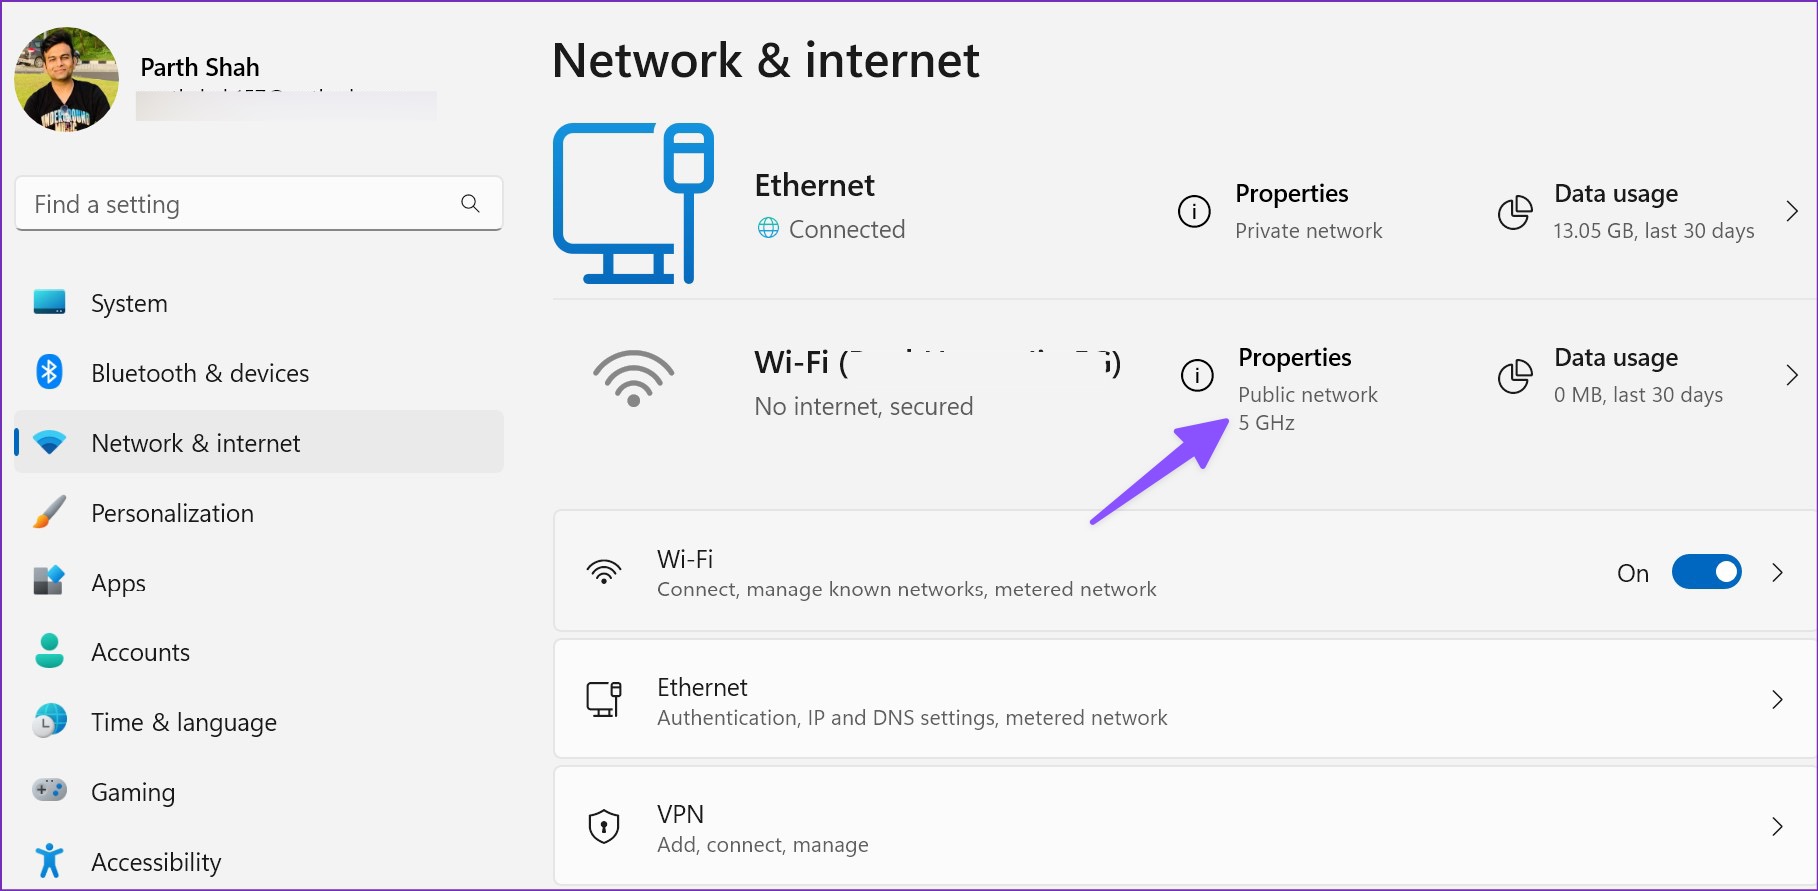
Seeing “Connected, No Internet” in Windows can be confusing. Your computer appears to be connected to Wi-Fi, but websites, applications, and other online services still cannot reach the internet.
The important distinction is that your PC may be connected successfully to your local network while something is preventing it from reaching the wider internet.
The cause could be your router, Windows network configuration, DNS, the network adapter, a VPN or proxy, or your internet service provider.
This guide takes you through the troubleshooting process from the safest checks to more advanced fixes. The goal is not to throw a long list of solutions at you, but to help you identify where the connection is failing and what to do next.
What Does “Connected, No Internet” Mean?
When Windows shows that your Wi-Fi is connected but says “No Internet,” the computer has usually established a connection with the local network, but Windows cannot confirm normal internet access.
For example:
- Your computer may communicate with the router.
- The router may have lost its connection to your ISP.
- Windows may not have received a usable IP address.
- DNS resolution may be failing.
- A VPN or proxy may be interfering with the connection.
- The network adapter or driver may have a problem.
So, “Connected, No Internet” does not automatically mean that your Wi-Fi hardware is broken.
Windows has built-in connectivity checks that help determine whether internet access is available, but the status message alone does not identify the exact cause.
What to look for: The wireless network should appear connected while Windows indicates that internet access is unavailable.
First Check: Is the Problem Only on Your PC?
Before changing Windows settings, check another device connected to the same network.
Use a phone, tablet, or another computer.
Connect it to the same Wi-Fi network and try opening a few websites.
If every device has no internet
The problem may be with:
- Your router
- Your modem
- Your ISP
- The internet connection entering your home
In that situation, changing Windows settings may not solve the underlying problem.
If other devices work normally
The problem is more likely limited to your Windows PC.
That makes the following Windows troubleshooting steps much more relevant.
This simple test is important because it separates a network-wide problem from a single-computer problem.
Step 1: Check Wi-Fi and Airplane Mode
Start with the simplest checks.
On Windows 11:
- Select the Network, Sound, or Battery icons on the right side of the taskbar.
- Make sure Wi-Fi is turned on.
- Confirm that your normal wireless network is selected.
- Make sure Airplane mode is turned off.
You can also open:
Settings → Network & internet
Check the connection shown on the page.
If Wi-Fi is disabled, enable it and wait a few seconds.
If it is already enabled, turn Wi-Fi off, wait several seconds, and turn it back on.
Then test the internet connection again.
What to look for: Confirm that Wi-Fi is enabled and that Windows recognizes the expected wireless network.
Step 2: Restart Your Modem and Router
If other devices also cannot access the internet, restart your networking equipment.
If you have separate modem and router devices:
- Turn off or unplug the router.
- Unplug the modem.
- Wait about 30 seconds.
- Restore power to the modem.
- Wait for it to finish starting.
- Restore power to the router.
- Wait several minutes.
- Reconnect your Windows computer.
If you have a combined modem/router, restart that single device.
Do not repeatedly unplug the equipment every few seconds. Give it enough time to shut down and reconnect.
If the internet works again afterward, the issue may have been temporary.
If the problem keeps returning, continue troubleshooting instead of relying on repeated restarts.
Step 3: Forget the Wi-Fi Network and Reconnect
If other devices work normally but your Windows computer does not, the saved Wi-Fi profile could be contributing to the problem.
On Windows 11, open:
Settings → Network & internet → Wi-Fi → Manage known networks
Find your wireless network.
Select Forget.
Then return to the Wi-Fi list, select the network again, choose Connect, and enter the Wi-Fi password.
This creates a new connection using the network’s saved settings.
What to look for: Make sure you select the correct Wi-Fi network before removing its saved profile.
After reconnecting, open a few websites.
Step 4: Run Windows Network Diagnostics
Windows includes troubleshooting tools that can check common network problems.
On current Windows 11 versions, Microsoft directs users toward the Get Help application for automated troubleshooting.
Open Get Help and search for:
connect to network and internet
Follow the network troubleshooting instructions shown by the application.
The exact screens can change as Microsoft updates the Get Help experience.
What to look for: The diagnostic should identify whether Windows detects a problem with the network or internet connection.
If Windows identifies a specific issue, read the result carefully before applying a suggested change.
Step 5: Check Your IP Address
If Wi-Fi connects but the internet does not work, checking your IP configuration can reveal an important clue.
Open Command Prompt as administrator.
You can do this by:
- Open Start.
- Type Command Prompt.
- Right-click Command Prompt.
- Select Run as administrator.
- Select Yes if Windows requests permission.
Enter:
ipconfigLook for the wireless adapter section.
You should normally see information such as:
- IPv4 Address
- Subnet Mask
- Default Gateway
The Default Gateway normally identifies the local router.
Pay particular attention to the IPv4 address.
If Windows shows an address beginning with:
169.254it can indicate that the computer did not obtain a normal IP address from the network’s DHCP service.
What to look for: Check the IPv4 Address and Default Gateway. If the IPv4 address begins with 169.254, note it before continuing.
Step 6: Renew Your IP Address
If the IP configuration appears problematic, ask Windows to obtain a new network configuration.
In Command Prompt as administrator, run:
ipconfig /releasePress Enter.
Then run:
ipconfig /renewPress Enter.
Windows will release the current DHCP configuration and request a new one.
Wait for the second command to finish.
Then try opening a website.
If the internet returns, the problem may have involved the previous IP configuration or DHCP process.
Step 7: Flush the DNS Cache
If your computer appears connected but websites are not opening correctly, DNS could be involved.
DNS, or Domain Name System, helps translate website names into IP addresses.
Windows keeps some DNS information locally.
To clear the cached information, open Command Prompt as administrator and run:
ipconfig /flushdnsYou should see a message confirming that the DNS Resolver Cache was successfully flushed.
Then try opening several websites.
Flushing DNS is a targeted troubleshooting step. It does not permanently change your DNS provider or network configuration.
Step 8: Reset the Windows Network Stack
If the previous steps did not solve the problem, you can reset several Windows networking components.
Open Command Prompt as administrator.
Run these commands one at a time:
netsh winsock resetThen:
netsh int ip resetThen:
ipconfig /releaseThen:
ipconfig /renewFinally:
ipconfig /flushdnsRestart the computer after completing the commands.
What These Commands Do
The commands target different parts of Windows networking:
netsh winsock resetresets the Winsock catalog used by Windows network applications.netsh int ip resetresets TCP/IP configuration components.ipconfig /releasereleases the current DHCP configuration.ipconfig /renewrequests a new DHCP configuration.ipconfig /flushdnsclears locally cached DNS information.
What to look for: Check that the commands complete and note any unexpected error messages.
If one command reports an error, do not simply ignore it. The message may provide a clue about what is failing.
Step 9: Check Your VPN and Proxy
A VPN or proxy can change how your computer connects to the internet.
If you recently enabled a VPN, disconnect it temporarily and test the connection again.
You can also check Windows proxy settings.
Open:
Settings → Network & internet → Proxy
Review the available proxy settings.
If you intentionally use a proxy for work, school, or another managed network, do not disable it without understanding why it is configured.
For a normal home connection, an unexpected manual proxy setting is worth investigating.
The goal is to determine whether the VPN or proxy is affecting the connection, not to permanently disable security or networking software.
Step 10: Check the Network Adapter
If the problem began after a Windows update, driver change, or hardware change, check the network adapter.
Open:
Start → Device Manager
Expand:
Network adapters
Look for your Wi-Fi or Ethernet adapter.
Check for:
- Warning symbols
- Disabled devices
- Unexpected errors
- Missing network adapters
Do not immediately uninstall the adapter.
If you eventually need to reinstall its driver, first make sure you have a suitable driver available from the computer or network-adapter manufacturer’s official support website.
This is important because your PC may not be able to download a replacement driver while it is offline.
Step 11: Test Ethernet if You Normally Use Wi-Fi
If your computer has an Ethernet port, connect it directly to your router temporarily.
This is useful as a diagnostic test.
If Ethernet works but Wi-Fi does not
The problem is more likely related to:
- Wi-Fi configuration
- Wireless driver
- Wireless interference
- Saved Wi-Fi profile
- Wireless adapter
If Ethernet also has no internet
The problem may involve:
- Windows networking
- Router connectivity
- DNS
- ISP service
- Another network configuration problem
You are not necessarily switching permanently to Ethernet.
You are using the wired connection to determine whether the problem is specific to wireless networking.
Step 12: Check Windows Update
If you can temporarily access the internet through another connection, check for Windows updates.
Open:
Settings → Windows Update
Select:
Check for updates
Install appropriate available updates and restart the computer if Windows requires it.
If the connection problem started immediately after a particular update, record that timing.
Do not automatically assume that the update caused the problem. The timing is useful evidence, but additional troubleshooting is needed to establish the cause.
Step 13: Use Network Reset as a Last Resort
Network Reset should not be your first troubleshooting step.
On Windows 11, open:
Settings → Network & internet → Advanced network settings → Network reset
Select:
Reset now
Windows will restart and reinstall the network adapters.
What to look for: Make sure you are on the Network reset page before selecting the reset option.
Network Reset can affect:
- Saved network configurations
- VPN software
- Virtual network adapters
- Other network-related software
For that reason, it makes more sense to use it after the simpler troubleshooting steps have failed.
What Not to Change
A common troubleshooting mistake is changing several unrelated settings at once.
Avoid these approaches unless there is a specific reason:
Do not immediately change your DNS provider
A DNS change may help with a DNS-specific problem, but it will not fix every type of internet failure.
Do not install random driver-update software
If you need a network driver, use the computer manufacturer’s or network-adapter manufacturer’s official support resources.
Do not reset Windows
A basic internet connection problem does not normally justify reinstalling or resetting the entire operating system.
Do not modify the Registry
Registry changes are rarely an appropriate first response to a basic Connected, No Internet problem.
Do not repeatedly restart the router
If restarting the router temporarily solves the problem but it keeps coming back, investigate the underlying cause.
If your computer is also behaving unusually, you may want to investigate whether there is a broader PC problem rather than assuming the internet connection is the only issue. LifeCoreHub’s guide on finding the cause of a suddenly slow computer can be useful for that separate situation.
How to Tell Where the Problem Is
Your troubleshooting results can help narrow down the cause.
| What you observe | What it suggests |
|---|---|
| Every device has no internet | Router, modem, or ISP problem |
| Only your Windows PC has the problem | PC configuration or adapter problem |
| Wi-Fi fails but Ethernet works | Wireless configuration, driver, or interference |
| Ethernet and Wi-Fi both fail | Windows networking, router, or ISP may be involved |
ipconfig shows 169.254.x.x |
PC may not be receiving a normal IP address |
| Reconnecting to Wi-Fi fixes it | Saved Wi-Fi configuration may have been involved |
| IP renewal fixes it | DHCP/IP configuration may have been involved |
| DNS flush fixes website access | Cached DNS information may have been involved |
| VPN disconnection fixes it | VPN or related network configuration may be involved |
| Network Reset fixes it | A deeper Windows network configuration problem may have existed |
The important point is that each result gives you information.
You are trying to identify the failing part of the connection rather than repeatedly applying unrelated fixes.
How to Verify the Fix
After applying a solution, test the connection properly.
1. Open several websites
Do not test only one website.
If one site fails but several others work, the problem may be specific to that website.
2. Test an application
Open an application that requires internet access.
3. Check Windows network status
Open:
Settings → Network & internet
Confirm that Windows now reports normal connectivity.
4. Test another device
Check the same Wi-Fi network with your phone or another computer.
5. Reproduce the original problem
If the problem originally occurred after waking your laptop from sleep or reconnecting to Wi-Fi, repeat that action.
A useful fix should remain effective when the original situation occurs again.
If “Connected, No Internet” Keeps Coming Back
If the problem repeatedly returns, look for a pattern.
Ask yourself:
- Does it happen after waking from sleep?
- Does it happen after Windows starts?
- Does it happen only on Wi-Fi?
- Does Ethernet remain stable?
- Does restarting the router temporarily fix it?
- Does the problem affect every device?
- Did the problem begin after a Windows update?
- Did it begin after installing VPN or security software?
- Does reconnecting to Wi-Fi immediately restore access?
The timing can be more useful than trying another random fix.
For example, if Wi-Fi works after restarting the computer but fails after waking from sleep, that points toward a different troubleshooting path than a situation where every device in the home loses internet access at the same time.
A Note About Network Security
If your internet problem started alongside unusual browser redirects, unexpected software, strange pop-ups, or other suspicious behavior, do not assume it is simply a network configuration problem.
In that situation, investigate the computer’s security state as well.
LifeCoreHub’s existing guide on removing malware and viruses from a PC covers a separate malware-troubleshooting workflow.
Do not install unknown “internet repair” utilities simply because Windows reports no internet access.
How to Prevent the Problem
You cannot prevent every network outage, but a few habits can make troubleshooting easier:
- Keep Windows and network drivers reasonably up to date.
- Use the router manufacturer’s current firmware when appropriate.
- Avoid installing unknown network utilities.
- Keep a record of your Wi-Fi password.
- Know whether your PC normally connects through Wi-Fi or Ethernet.
- If you use a VPN or proxy, know how to temporarily disconnect it for troubleshooting.
- Avoid changing several network settings simultaneously.
- Note what changed immediately before a recurring problem began.
If you are also concerned about securing your PC and home network, LifeCoreHub’s guide to protecting a PC from hackers and identity theft covers broader security measures.
Frequently Asked Questions
Why does Windows say connected but no internet?
It generally means your computer has established a connection to the local network but Windows cannot confirm normal internet access. The cause could be the router, ISP, IP configuration, DNS, VPN, proxy, or network adapter.
Should I restart my router if only my PC has the problem?
You can try it, but first test another device on the same network. If your phone and another computer work normally, the problem is more likely specific to your Windows PC.
Does flushing DNS fix a no-internet problem?
It can help when cached DNS information is contributing to the problem, but it will not fix every connectivity issue. ipconfig /flushdns is one of the standard Windows networking commands used during troubleshooting.
Is Windows Network Reset safe?
Network Reset is a built-in Windows troubleshooting feature, but it should generally be used after simpler checks. It removes and reinstalls network adapters and resets their settings, so VPNs and other network software may require configuration again.
What does a 169.254 IP address mean?
A 169.254.x.x address can indicate that Windows did not obtain a normal IP address from the router through DHCP. Reconnecting to Wi-Fi, restarting the networking equipment, and renewing the IP configuration are reasonable next troubleshooting steps.
Conclusion
When Windows says “Connected, No Internet,” the computer may be connected correctly to the local router while something is preventing normal internet access.
Start by checking whether other devices have the same problem. Then check Wi-Fi and Airplane mode, reconnect to the wireless network, and restart the router if necessary.
If the problem is limited to your PC, check the IP configuration, renew the connection, flush DNS, and reset Windows networking components when appropriate. More disruptive options such as Network Reset should be left until the simpler troubleshooting steps have failed.
The most useful troubleshooting habit is simple: change one thing at a time and test the result. That makes it much easier to identify the actual cause.
Authoritative Sources
- Microsoft Support — Fix Wi-Fi connection issues in Windows: official guidance for Wi-Fi checks, router troubleshooting, network commands, adapter troubleshooting, and Network Reset.
- Microsoft Support — Fix Ethernet connection problems in Windows: guidance for wired connection troubleshooting.
- Microsoft Support — Windows network settings and troubleshooting: Windows networking configuration and diagnostic information.
LifeCoreHub’s own editorial policy states that its how-to content is intended to help readers understand and solve common technology problems, with attention to differences between devices and software versions.