
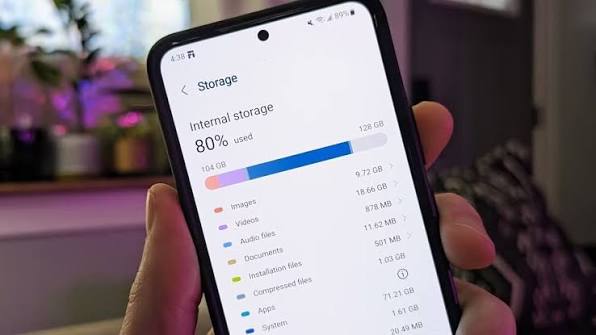
Running out of storage on an Android phone is frustrating, especially when the storage warning appears while your phone is full of photos you do not want to lose.
The good news is that your photos are often not the only thing using space. Downloaded videos, large app files, cached data, offline content, duplicate files, screenshots, and apps you no longer use can consume a surprising amount of storage.
The safest approach is to find what is actually using the storage before deleting anything. That lets you recover space without randomly removing personal files.
This guide explains how to check Android storage, identify large files, clean temporary data, review downloaded content, manage apps, and protect important photos before removing anything.
Before You Delete Anything: Know What Is Using Your Storage
Android phones can show storage categories such as:
- Apps
- Photos and videos
- Music and audio
- Documents and other files
- System
- Downloads
- Cached data
The exact categories and menu names vary between Android phones and manufacturers.
Start by opening your phone’s Settings app and looking for Storage. On many Android devices, you can find it under:
Settings → Storage
Some manufacturers use a slightly different path, such as:
Settings → Battery and device care → Storage
The important part is to identify the category consuming the most space.
If photos and videos are using most of your storage, do not immediately delete them. First check whether they are backed up.
If apps are consuming most of the space, you may be able to recover storage without touching your photos at all.
Step 1: Check Whether Your Photos Are Backed Up
Before removing photos from your phone, confirm that important pictures exist somewhere else.
If you use Google Photos, open the app and check the backup status associated with your account. Google provides a Free up space on this device feature that can remove local copies of photos and videos that have already been backed up.
This is different from simply deleting photos manually.
A backed-up photo can remain available through Google Photos while its local copy is removed from the phone. However, you should still verify that the content you care about has actually finished backing up before removing local copies.
If your photos are stored only on the phone, do not use a storage-cleaning option that removes them.
You can also keep another copy of particularly important photos on a computer or another trusted storage location.
Step 2: Use Android’s Storage Screen to Find the Largest Categories
Once your photos are protected, return to the Android storage screen.
Look for categories taking up significant space.
For example, suppose your phone has 128 GB of storage and the storage screen shows that apps, videos, and downloads are consuming most of it. There is little reason to start deleting hundreds of photos.
Instead, investigate the largest category first.
This is an important habit:
Do not clean storage based on what is easiest to delete. Clean the category that is actually consuming the most space.
Android’s available storage information can vary by device and Android version, so do not worry if your menu looks different from another phone.
Step 3: Check Your Downloads Folder
The Downloads folder is one of the easiest places to overlook.
Files downloaded from browsers, messaging apps, email attachments, websites, and other applications can remain on your phone long after you stop needing them.
Open your phone’s file manager. Depending on the manufacturer, it may be called Files, Files by Google, My Files, or something similar.
Open:
Downloads
Review the files individually.
Look for things such as:
- Old PDF files
- Installation packages you no longer need
- Duplicate documents
- Downloaded videos
- Images saved from websites
- Old ZIP files
- Documents you already stored elsewhere
Delete only files you recognize.
If you are unsure about a file, leave it alone until you determine which app created it and whether you still need it.
Step 4: Review Large Videos
Videos can consume considerably more storage than ordinary photos.
Open your gallery or file manager and look for large video files.
Pay particular attention to:
- Screen recordings
- Downloaded movies or shows
- Messaging-app videos
- Old camera recordings
- Duplicate videos
- Videos shared through social apps
- Videos exported from editing applications
If a video is important, back it up before deleting its local copy.
If you regularly record videos, changing future recording habits may help prevent the same problem from returning.
Step 5: Remove Offline Downloads You No Longer Need
Many apps let you download content for offline use.
That content may include:
- Music
- Podcasts
- Videos
- Maps
- Documents
- Web pages
- Streaming content
The files may not always appear as ordinary documents in your file manager.
Instead, open the relevant application and check its Downloads, Offline, or storage section.
For example, if you downloaded a large collection of videos for a trip months ago, you may be able to remove the offline copies without uninstalling the application.
This is often safer than deleting random files from Android’s internal storage.
Step 6: Clear App Cache When It Is Actually Useful
Cached data consists of temporary files that apps use to improve performance.
You can normally inspect an app’s storage information by going to something similar to:
Settings → Apps → [App name] → Storage
Depending on the Android version and manufacturer, you may see an option such as Clear cache.
Clearing cache is different from clearing app data.
Clear cache
This removes temporary cached files.
Clear storage or Clear data
This can remove locally stored application information and may reset the app or require you to sign in again.
For that reason, do not treat Clear storage as a routine storage-cleaning button.
If an app is behaving normally, there may be little reason to clear its data simply because you want more free space.
Step 7: Look for Apps You No Longer Use
Apps themselves can occupy significant storage, and some applications also accumulate additional data.
Go to your installed-app list and review applications you have not used for a long time.
Ask:
- Do I still use this app?
- Do I need its locally stored data?
- Can I reinstall it later if necessary?
- Does the app contain files or projects that are not synchronized elsewhere?
If an app is unnecessary, uninstalling it can recover both the application’s storage and some associated data.
Be more careful with applications containing locally stored documents, editing projects, authentication information, or other data that may not be backed up.
Step 8: Check Messaging Apps
Messaging applications can quietly accumulate large amounts of media.
A conversation may contain years of:
- Photos
- Videos
- Voice recordings
- GIFs
- Documents
- Stickers
- Forwarded files
Open the storage-management section inside your messaging applications if one is available.
Instead of deleting entire conversations, look for large media files that you no longer need.
This approach can recover storage while allowing you to keep important conversations.
Step 9: Review Screenshots and Duplicate Images
Screenshots are easy to forget.
You may have hundreds of images containing:
- Temporary information
- Online receipts
- Conversations
- Maps
- Error messages
- Product pages
- Social media posts
Review your screenshots folder periodically.
Also look for duplicate or nearly identical photos.
If your phone’s gallery or file-management app provides a duplicate-file cleanup feature, review its suggestions before confirming deletion.
Do not automatically delete every image identified as a duplicate. Similar-looking images may still be different files that you want to keep.
Step 10: Use Google’s Files App Carefully
If your phone has Files by Google, it can help identify files that may be unnecessary.
The app can surface categories such as large files, duplicate files, unused apps, or other items that may be candidates for cleanup.
Treat these recommendations as suggestions, not automatic permission to delete everything.
Before confirming a cleanup:
- Check the file name.
- Check where it came from.
- Open important files when necessary.
- Confirm you have another copy if the file matters.
- Delete only what you recognize.
The goal is not to make the storage screen look empty. The goal is to remove unnecessary data without losing something important.
Step 11: Check WhatsApp and Other Media-Heavy Apps
Some applications have their own storage-management tools.
WhatsApp, for example, can accumulate large amounts of media over time. Similar behavior can occur with other communication and social applications.
Look inside the app’s settings for a storage or media-management area.
Focus on large files and media you no longer need rather than deleting everything from a conversation.
If you frequently receive large videos or forwarded images, changing automatic media-download settings may also reduce future storage growth.
The exact options depend on the application version and your device.
Step 12: Do Not Confuse Photos in the Cloud With Photos Stored Locally
Cloud photo backup can make storage management easier, but there is an important distinction:
A photo being visible in a cloud photo app does not automatically mean you should delete its local copy.
First verify that the photo has been backed up successfully.
Then use the photo service’s own storage-management feature when available.
This is safer than opening a file manager and deleting image folders manually because you may otherwise remove files that have not been backed up.
If you use Google Photos, its help documentation explains how backed-up photos can be removed from the device while remaining accessible through the service.
A Safer Storage-Cleanup Order
If your phone is almost full, use this order:
1. Check storage
Find the categories consuming the most space.
2. Protect important photos
Verify backups before removing local copies.
3. Remove unnecessary downloads
Delete files you recognize and no longer need.
4. Review large videos
Back up important recordings first.
5. Remove unused offline content
Check individual apps.
6. Review unused apps
Uninstall applications you no longer need.
7. Clean unnecessary messaging media
Target large files rather than entire conversations.
8. Review screenshots and duplicates
Delete only files you have identified.
9. Clear selected app caches
Use this when it makes sense rather than clearing every app.
10. Recheck storage
Return to the storage screen and see where the space went.
This method makes it easier to understand whether the cleanup actually worked.
What You Should Not Delete Just to Free Space
Avoid deleting system files or unfamiliar folders simply because their names look complicated.
You should also avoid randomly removing folders from internal storage.
Be particularly careful with:
- Files belonging to applications
- Authentication or security-related files
- Work or school documents
- Photos that have not been backed up
- Video projects
- Files whose purpose you cannot identify
- App data that may exist only on the device
More deletion is not always better.
A smaller cleanup that you understand is safer than a large cleanup that removes files you may later need.
What If Your Phone Still Says Storage Is Full?
If you removed files but Android still reports very little free space, give the device a moment to recalculate storage and then check the storage screen again.
If the problem continues, investigate the largest categories individually.
For example:
Photos are large → verify backup and review videos.
Apps are large → review unused apps and individual app storage.
Downloads are large → clean the Downloads folder.
Messaging media is large → use the messaging app’s storage controls.
Other files are large → inspect your file manager carefully rather than deleting unknown folders.
If you regularly run out of space, your problem may be ongoing storage growth rather than one large group of unwanted files.
How to Prevent Android Storage From Filling Again
Once you recover space, change the habits that caused the problem.
Review downloads regularly
Do not allow the Downloads folder to become a permanent archive.
Remove offline content after trips or projects
Downloaded movies, maps, music, and documents are useful when needed but can become forgotten storage.
Watch video recording
Long high-quality videos can fill storage quickly.
Review messaging media
Large files sent through group chats can accumulate without being obvious.
Keep photo backups organized
A reliable backup system makes it easier to remove local copies when necessary.
Leave some free space
You do not need to wait until Android displays a storage warning before cleaning your phone.
A Simple Decision Tree
When Android storage is nearly full:
Is Photos & Videos the largest category?
→ Verify your photo backup.
→ Review large videos and unnecessary screenshots.
→ Use your photo app’s storage-management feature where appropriate.
Are Apps the largest category?
→ Review unused apps.
→ Check individual app storage.
→ Clear selected caches when appropriate.
Are Downloads large?
→ Open Downloads.
→ Remove files you recognize and no longer need.
Are messaging apps using lots of space?
→ Open their storage-management tools.
→ Remove unnecessary large media.
Is the storage still full after cleanup?
→ Recheck every major category.
→ Look for offline downloads, large files, or application data that you overlooked.
How to Confirm You Actually Freed Space
After cleaning:
- Return to Settings → Storage or your phone’s equivalent.
- Check the amount of available storage.
- Compare the major storage categories with what you saw before.
- Open your photo app and confirm important photos are still accessible.
- Open important applications and make sure they work normally.
- Check that important documents and downloads remain available.
If you removed local copies of backed-up photos, verify that they remain accessible through your backup service.
If Storage Keeps Filling Up Again
If your phone repeatedly reaches low storage even after a careful cleanup, look for the category that grows over time.
For example, if the storage warning returns after a few weeks, compare the storage screen again.
A recurring increase in Videos, Apps, Downloads, or messaging media points toward a different cause than a one-time collection of old files.
For broader Android storage troubleshooting, you can also review our guide on why your phone storage keeps filling up after you delete photos and videos.
The key is to find what is growing instead of repeatedly deleting random files.
Final Takeaway
Freeing Android storage does not have to mean deleting your important photos.
Start by identifying what is actually consuming storage. Protect your photos with a verified backup, then work through downloads, large videos, offline content, unused apps, messaging media, screenshots, duplicates, and selected app caches.
Most importantly, do not delete unfamiliar files just because Android says storage is low.
A careful cleanup takes a little longer, but it gives you much better control over what stays on your phone and what can safely be removed.
Frequently Asked Questions
Can I free Android storage without deleting photos?
Yes. Check downloads, large videos, unused apps, offline content, messaging media, screenshots, and unnecessary cached files first. If photos are using substantial space, verify that they are backed up before considering removal of local copies.
Does clearing cache delete my photos?
Normally, clearing an individual app’s cache removes temporary cached files rather than your personal photo library. However, the exact behavior depends on the app, so review the option carefully and do not confuse Clear cache with Clear storage or Clear data.
Why is my Android storage full when I do not have many photos?
Apps, videos, downloads, offline media, messaging attachments, and app data can consume substantial storage even when your photo collection is relatively small.
Is it safe to delete files from the Downloads folder?
It can be, but check each file first. Downloads may contain documents, installers, images, or other files that you still need. Delete only files you recognize and no longer require.
Should I delete app data to free storage?
Not automatically. Clearing app data can reset an application or remove locally stored information. Check whether the app synchronizes its data before using Clear storage or Clear data.